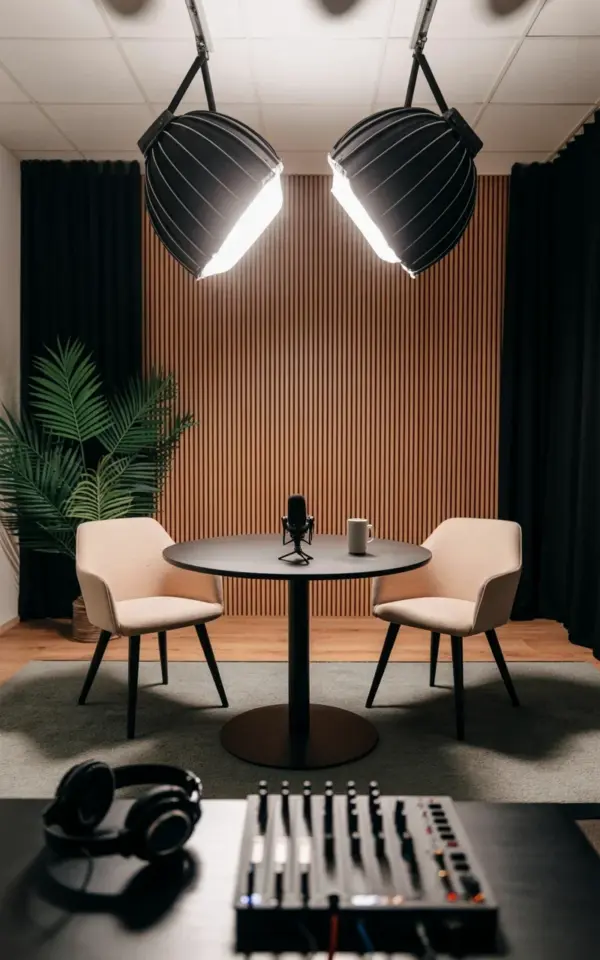
When I first started building my own podcast studio setup, I was convinced it needed to look like a sterile tech lab. Black acoustic foam, industrial cable trays, and a heavy, imposing desk. But after months of recording, the space felt cold and drained my energy before I even hit the record button. It was my wife who suggested I look at the design from a different angle. She pointed out that the best conversations happen in living rooms, not server rooms. That single comment pushed me to explore more professional podcast studio setup ideas, and what I landed on completely changed my workflow and the tone of my show. It is the exact vibe you see in the reference photo: a round black table with plush beige chairs, hanging softboxes, and a warm wood slat wall that balances the high-tech audio gear perfectly.
Why a Round Table Changes the Dynamic of Your Recording Space
I have recorded in front of standard rectangular desks for years, but the moment I switched to a round black table, the atmosphere shifted. There is no hard, geometric barrier between you and your guest. Instead, the curve creates a subtle sense of inclusion and makes turning slightly toward each other feel entirely natural. It is a tiny psychological trick, but in my experience, it lowers the guard of first-time guests almost immediately.
From a practical standpoint, a round table also solves the issue of microphone placement. You can keep the recording gear tucked near the center while still maintaining about six inches of distance between the mic capsule and the guest’s mouth. In the reference image, the table is low enough to keep the sightlines clear, so the audio mixer and headphones sit visibly in the foreground. That gear presence actually adds a layer of professionalism. It tells your audience you are taking the production seriously, without making the guest feel like they are in an interrogation chair.
If you are working in a smaller room, this shape is a lifesaver. A 48 inch round table fits where a traditional 6 foot desk never would. You eliminate bulky corners and create a smoother traffic flow around the seating area.
Using Textured Visuals Instead of Flat Acoustic Panels
One of the biggest mistakes I made early on was covering every flat surface with boxy foam panels. They worked acoustically, but they looked like a mattress had exploded on the wall. In my current podcast studio, I replaced the foam with vertical wood slat panels in a warm brown tone. This does not mean I sacrificed sound quality. The slats are installed with acoustic backing in between, which catches the echoes while the wood provides a natural reflection that keeps the room from sounding too dead.
The visual benefit is undeniable. The wood slat wall brings a texture and warmth that makes the entire room feel more grounded and authentic. It photographs well too, which matters because most people are watching clips of my episodes on social media. I pair those slats with a dark gray carpet on the floor. The carpet absorbs foot traffic noise and acts as the visual anchor for the whole room. The black curtains on the side walls add a touch of theatrical framing and help control stray sunlight, a major factor when you have bright softboxes overhead.
For anyone planning a home podcast studio, think about the layers here. This is a practical and stylistic checklist for this exact look:
- Start with a dark or neutral carpet to ground the furniture and hide wear.
- Add vertical wood slat panels to give the wall depth and some acoustic reflection.
- Hang floor to ceiling curtains to soften the corners and block ambient light.
- Keep the chairs low profile with plush upholstery for comfort and visual balance.
- Finish the space with a touch of natural life, like a large palm plant, to clean the air and soften the technology.
The Right Softbox Lighting Design for a Content Creation Studio
Lighting in a content creation studio needs to be flattering enough for a face cam yet durable enough for long interviews. Hanging softboxes from the ceiling is the best decision I have made in my recording room. In the image, you see two large black softboxes hovering above the table. This is not just for cinematic looks. Ceiling mounting frees up valuable floor and table space. It also creates a 45 degree downward angle that wraps around the face, reducing harsh shadows under the eyes. That look is what people often describe as a “polished” broadcast style.
Positioning the softboxes above the table, slightly in front of the talent, prevents the light from flattening the subject. I use a 90 degree spill pattern, but if your room is tighter, you can always adjust the angle. The key is to keep the fixtures high enough so they do not intrude on the shot. If you have wooden beams in the ceiling or drop ceiling tiles, you can mount light stands to the T grid. If not, a simple boom arm pole works wonders. The hanging softboxes also hide the inevitable cables that run along the ceiling, which keeps the floor looking immaculate and safe for people walking in with coffee.
Before you pick your size, test your room’s natural light. I found that 24 inch softboxes are the sweet spot for a room that is roughly 10 by 12 feet. They offer a big enough source to wrap the light naturally but never overwhelm the room with spill or heat.
Essential Audio Gear Layout for the Home Podcast Studio
A beautiful room cannot save a bad signal, so you need a designated spot for your audio mixer and interface. In the setup we are referencing, the audio mixer sits in plain sight on the table, with a set of headphones resting next to it. This is a good design choice for credibility and for quick adjustments mid-episode. You do not want to reach behind your guest to change a knob every time the audio peaks.
Keep the signal chain as simple as possible. I run XLR cables from the microphones to a mixer located at the edge of the table, then a single USB cable from the mixer to the laptop. That USB cable is the only wire that runs off the table, which keeps the setup tidy. I recommend investing in high quality XLR cables with a braided exterior. They are more flexible, look better on camera, and last longer.
Headphones placement matters too. When they are resting horizontally on the table in the foreground, they instantly communicate that this is a serious recording room. But for recording days, make sure there is a dedicated hook under the table. Placing them on the table creates an obstacle between you and your guest, and it creates extra noise if the cable drags.
Choosing Comfortable Seating for Long Recording Sessions
I know it seems minor, but your chair can derail an episode. In the photo example, the beige upholstered chairs with black legs are low profile and inviting, but they also have supportive bases. We sit for an hour and a half per episode, and I need my lower back to stay engaged without me slouching. Look for chairs with good foam density. Cheap chairs that sink in the middle will eventually cause you to hunch toward the microphone, which changes the proximity effect and makes your voice boom unpredictably.
The visual contrast of the beige chairs against the black table and dark gray carpet is intentional. The lighter tones create an inviting human presence against the masculine, tech-heavy equipment. If you are building a home podcast studio and plan to have guests, avoid chairs with loud patterns. Solid colors are easier to manage on camera. If you buy chairs with arms, make sure the arms fit under the table height. Nothing breaks the flow of an episode like a guest having to sit a foot away because the chair arms bump the table edge.
I also put small felt pads on the bottom of the chair legs. The carpet in the reference image is forgiving, but those pads make sliding in and out silent during a live recording.
Sightlines and Background Decor Without the Clutter
The composition of your background decides how professional your final video looks. I learned this when I set up my first content creation studio and just placed the desk against a bare white wall. The image looked flat and empty, and the framing made the podcast studio setup come across as cheap. To fix it, I used the rule of thirds. The desk and table sit in the lower third, the wood slat panels and softbox heads fill the middle, and the palm plant in the left corner adds vertical interest to balance the black mixer foreground on the right side.
That palm plant is not random decoration. Leaves break up the hard rectangular lines of the panels and the softboxes. They add a soft, organic curve that catches the light and makes the room feel alive. Just make sure the leaves are not directly in front of a microphone or a speaker, as they can create odd reflections or block your guest’s face. In this specific layout, the plant sits safely in the left corner, out of the main vocal path but still very visible in a wide shot.
Keep personal items to a minimum. A few books, an award, or a small console can work, but do not let the background become a Where’s Waldo puzzle. You want the eye to linger on your guest and the conversation, not on the cable box or photos on the shelf.
The Practical Layout and Workflow Benefits of This Setup
This whole design is more than just a pretty face. The workflow inside this space is lightning fast. When I look at the reference image, I see a space designed for efficiency and content volume. In a single afternoon, I can record two episodes because the microphones stay at the exact height and distance. The lights remain locked in position, which means my exposure does not change between segments.
Having the wood slat wall behind the main seating area also creates a subtle sonic boundary. It isolates the reflective surfaces of the side curtains and the flat ceiling, stopping comb filtering. This allows the mixer to capture a cleaner sound without excessive post processing. The carpet is your first line of defense against slapback echo on your floor. When you combine that carpet with the thick curtains and the wooden background, you get a dry enough signal for broadcast.
If you are planning your own recording space, always test all of these positions while sitting down. Stretch your arms toward the mixer. Kick your feet under the table. Turn to your guest and see if you can maintain eye contact while keeping your mouth on the microphone axis. If any movement causes a cable to shake or a chair to shift, fix it before you bring your expensive audio gear in for good.
Building a professional podcast studio is an act of balance. You have to fight for great acoustics without making the room feel like a padded cell, and you need a stylish layout that can still support the technical demands of recording. This specific arrangement with the round table and softbox lighting proves that a home podcast studio can look like a warm, expensive lounge while still handling the audio work of a serious show. If you are sketching out your own visions on paper, let this reference guide you toward a mix of textures, acoustic control, and strategic lighting. Do not just copy the photo, adapt the underlying ideas to your space and show format.
If you are ready to plan your next step, start your design with seating and lighting. Once those are dialed in, the rest of the podcast studio workflow will follow easily, and I hope you share your own results when you are done.
Leave a Comment